
Other Settings Editor
This tool has several tabs enabling you to do any of the following actions:
- edit the auto-shutdown setting
- edit clipboard settings
- edit logging settings
- create a Courier desktop shortcut
- reset your Courier master password
- run an audit report showing strength and multiple use for all your passwords
- import item records from an external text file
- export item records to an external text file
- backup your Courier folder (all users)
- factory reset all settings
- edit hidden settings
General Tab:
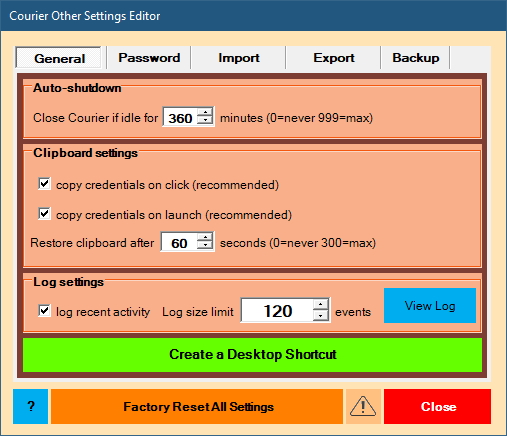
Here you can change auto-shutdown, clipboard settings, logging settings, and create a Courier desktop shortcut.
- Auto-shutdown setting
In case you forget to close Courier before walking away from your PC, Courier can automatically shut itself down after a number of minutes of inactivity.- To enable this feature, set the number of minutes to greater than zero.
- To disable this feature, set the number of minutes to zero
- Clipboard settings
Courier’s clipboard options are one of its most useful features. Say an item has no autofeed — just click or launch the item to copy the credentials to the clipboard, then paste/select/cut/paste the credentials from the clipboard!- Checking the first box enables Courier to copy your credentials to the clipboard whenever you click an item
- Checking the second box enables Courier to copy your credentials to the clipboard whenever you launch an item
- For maximum security, Courier can automatically restore the Windows clipboard to its previous value after a given number of seconds. To enable this feature, set the number of seconds to greater than zero.
To disable this feature, set the number of seconds to zero.
- Log settings
You can optionally create a timestamped log of general steps you take as you use Courier. This log can serve as a useful reminder, or even as a substantiation of work activity done over time.- Checking the box enables logging of 25-10,000 of the most-recent steps you take
- Un-checking the box disables logging. If any steps exist in your log, Courier then prompts you to optionally erase them
- Click the “View Log” button to view log entries in date order. Tip: you can select and copy some or all rows to the clipboard for pasting into Excel or elsewhere.
- Create a Desktop Shortcut to Courier
Courier is designed to run from any drive connected to your Windows PC (hard, external, USB Flash, etc.).Each Courier is completely self-contained so you can install it in multiple locations. For example, one on your home PC hard drive, one on your work PC hard drive, and one on a Flash drive for portable use — then use Courier’s export and import tools to share items.
- Click this button to create a Windows desktop shortuct pointing to the currently-running Courier
Example: say you’re running Courier from a flash drive. Clicking will create a desktop shortcut that runs that Courier. Afterwards you can rename the shortcut something like “Courier Flash.”
Password Tab:
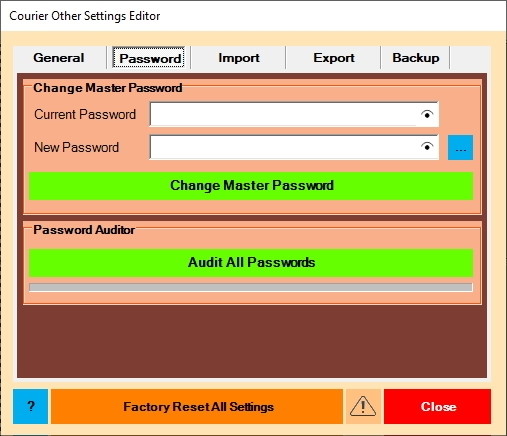
Here you can change your Courier master password or run a strength audit of all your passwords.
- Change Master Password
- Type in the current master password, then type in a new master password
- To open the Password Designer click the small blue box
- Finally, click the “Change Master Password” button
- The password change doesn’t take effect until you exit the Other Settings Editor and click the “Save” button at the Settings Editor.
- Warning: if you forget your master password, there is no way to recover it!
- Password Auditor
- Click the “Audit All Passwords” button to start an audit
- Only items with a password will be audited
- When the audit finishes, a data window will appear showing the results
- Note you can click on any column header to sort the data by that column
- The password strength values are:
- Very Weak
- Weak
- Medium
- Strong
- Very Strong
- As a general rule we recommend only using passwords with a strength of “Strong” or “Very Strong”
- For convenience you can click the “Jump To” button to be taken to the item in the Launchpad
Import Tab:

The import tab allows you to either bulk-import item information, or bulk-import general settings information.
Import item information is useful to quickly load credential information you may have stored in an external file such as a spreadsheet. Typically, you must create your credential items by hand, one-by-one.
Import settings is useful to quickly load general settings from a backup file, such as color, font, and sound selections, etc.
Import item information: merge option
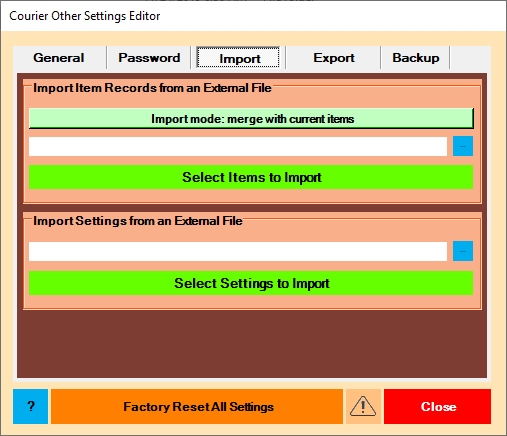
Click the import options button to toggle the setting. The merge option preserves your current items by inserting imported items into your existing groups. Click the blue button to select an external item information file. Then click the “Select Items to Import” button to display the item selector window where you can select one or more items to import.
Import item information: delete option
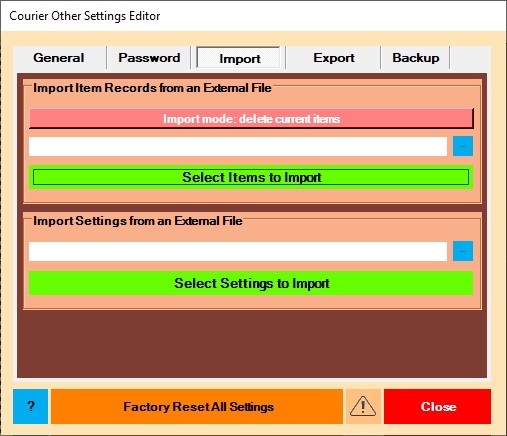
Click the import options button to toggle the setting. The delete option erases all your current items then inserts imported items. Click the blue button to select an external item information file. Then click the “Select Items to Import” button to display the item selector window where you can select one or more items to import.
Import items selector

You don’t have to import all items in the import file you chose. Here you can select only the items you want to import. Click or use up/down arrow keys to select a single item. Click the upper-left box to select all items. <Ctrl>+click to select multiple items. <Ctrl>+A selects all items.
Once you’ve completed selecting items, click the Apply button.
Remember that your changes are not permanent until you click the “Save” button in the settings editor. If you’re not sure, click cancel to back out to the Launchpad then try again.
Import settings information
Here you can import from a backed up settings file in case you’ve had to reset Courier to factory defaults, etc. Your settings are automatically saved by Courier in your user folder.
For example, if your user is “jillSmith_laptop” then your settings file is located in your backup folder at:
…\Courier\usr\jillSmith_laptop\jillSmith_laptop.ini
Tip: Courier shows you your user identifier when it first starts. For example, if you see:
Courier sign in: jillSmith on laptop
Then your user identifier is "jillSmith_laptop"
Click the blue button to select an external settings (*.ini) file. Then click the “Select Settings to Import” button to display the settings selector window where you can select one or more settings to import.
Import settings selector
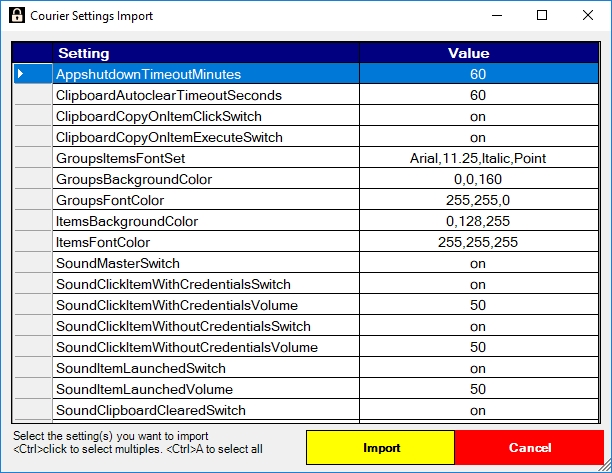
You don’t have to import all settings in import file you chose. Here you can select only the settings you want to import. Click or use up/down arrow keys to select a single item. Click the upper-left box to select all items. <Ctrl>+ click to select multiple items. <Ctrl>+ A selects all items.
Once you’ve completed selecting items, click the Apply button.
Remember that your changes are not permanent until you click the “Save” button in the settings editor. If you’re not sure, click cancel to back out to the Launchpad then try again.
Export Tab:
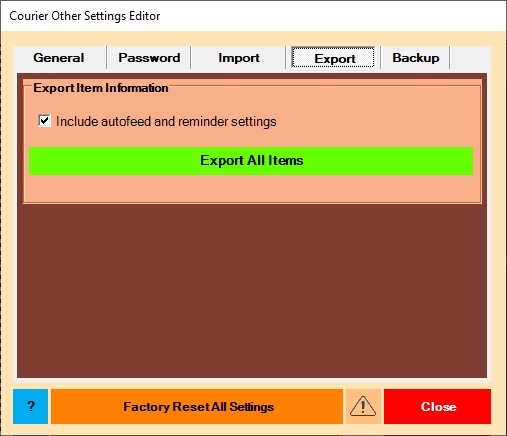
Here you can export your item information to a readable tab-delimited text file suitable for import into other programs like MS Excel or LibreOffice Calc.
[WARNING] using export defeats a key purpose of Courier which is keeping your private item information secure in an unreadable file!
Use export with extreme caution and only if you clearly understand the risk. Advanced users often use it as a partial backup method, or use it to feed item data to outside editors to manipulate then re-import.
Tip: always include settings when you export, which is the default setting.
Courier writes exported files to your user folder’s "exp" folder.
For example, if your user is “jillSmith_laptop” then your exp folder is located at:
…\Courier\usr\jillSmith_laptop\exp
Tip: Courier shows you your user identifier when it first starts. For example, if you see:
Courier sign in: jillSmith on laptop
Then your user identifier is "jillSmith_laptop"
Backup Tab:
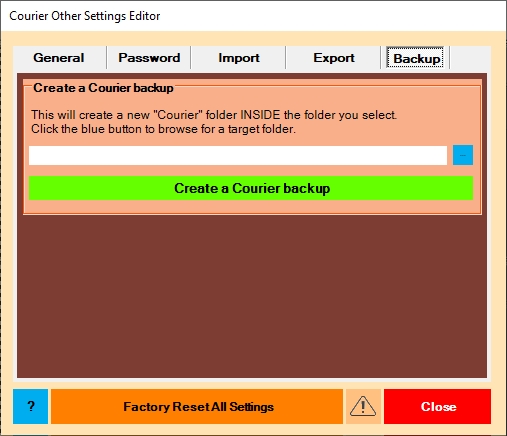
Here you can create a backup copy of your Courier folder. Please note that if multiple users share Courier, all data will be backed up.
First you need to pick a writable folder on your system to store the backup folder in. Click the blue button to browse for such a folder.
Tip: You can create new folders inside the folder browser window.
Once you’ve picked a writable folder, click the green button to start the backup.
Toolbar Buttons:
Factory reset all settings:
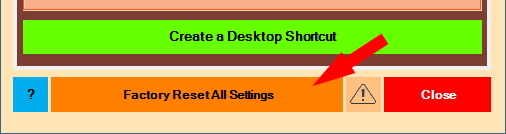
Courier stores a complete set of factory default settings in memory, which are primarily used to build new users.
At any time you can reset all your settings to these default values. To do this, just click the button titled “Factory Reset All Settings”.
Remember that your changes are not permanent until you click the “Save” button in the settings editor. If you’re not sure, click cancel to back out to the Launchpad then try again.
Edit hidden settings:
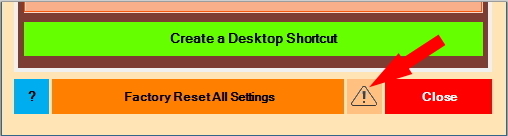
In addition to the main Courier settings, there are over 40 “hidden” settings exposed for you to further fine tune your look-and-feel. Click the yellow caution button along the lower edge to open the editor:
Hidden settings selector
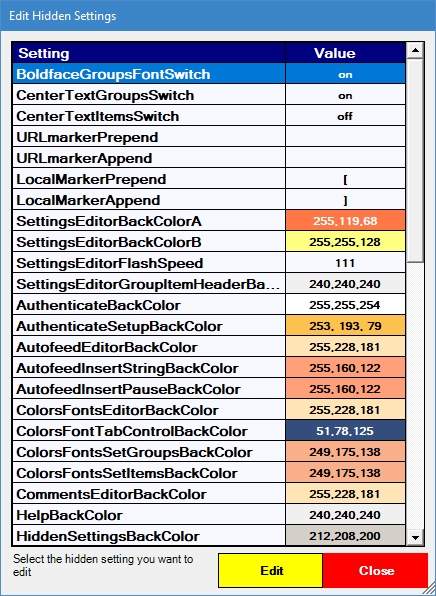
These setting names are used in the programming code. A short description of the selected setting appears in the lower left message area.
Color values look like three numbers separated by commas (ex/ 0,0,0 for black).
Use your mouse or keyboard to scroll and select a setting to edit.
To edit a setting, select it, then click the Edit button. There are four types of fields, with each having its own popup edit window:
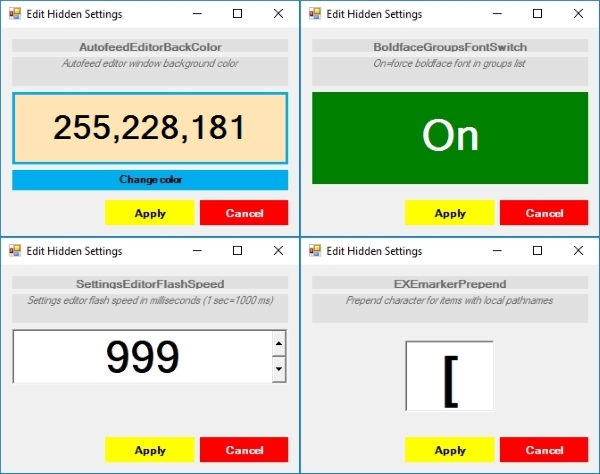
- change color:
- click the Change color button to open the Windows color selector tool
- select a new color or cancel
- click Apply button or cancel
- change on/off switch:
- click the large green or red button to toggle the setting
- click Apply button or cancel
- change timer speed:
- value is in milliseconds (1 sec = 1000 ms)
- click in the number box and type the new setting, or use the up/down arrows
- minimum value is 100, and maximum value is 99999
- click Apply button or cancel
- change a single character:
- click in the text box and type or erase the character
- click Apply button or cancel
Customization tip: to make the Courier logon screen background transparent, set AuthenticateBackColor to 255,255,254.
Customization tip: to display an image as the Courier logon screen background, set AuthenticateBackColor to 0,0,1. To change the image, overwrite the JPEG file at …\Courier\bin\images\fa410x113.jpg. For best results use image size of 410×113 pixels.
Remember that no changes are permanent until you click the Save button in the Settings Editor window. If you’re not sure, click cancel to back out to the Launchpad then try again.
Tutorial: item import file format
Courier item import expects a specific file format and type. You need to massage your external credentials data into a formatted tab-delimited text file. Excel or Libre Calc are good tools for doing this.
Row 1 of the file must contain valid column header names shown below.
Row 2+ must contain item records.
Tip: scroll down for a tutorial on building a valid item import file from scratch.
Here are the valid column headers (use brackets only in row 1):
- Required fields:
- [GroupName] – data example: "Productivity"
- [ItemName] – data example: "EverNote"
- [URL] — data example: "https://www.evernote.com/"
- Optional fields:
- [Comments] — data can be any text
- [LogonID] – data example: "qqq@gmail.com"
- [Password] – data example: "P@SsW0rD"
- [AutofeedSwitch] – data example: "on" or "off"
- [AutofeedSteps] – data example: "d30000,id,9,d1000,pw,13"
- [ReminderDays] – data example: "90"
- [ReminderEffDate] – data example: "12/29/2016"
Note that “[URL]” can also be a pathname to any local app or file on your computer or local network. For example "C:\Windows\system32\notepad.exe"
Tip: to find a local app’s pathname, right-click the program’s Windows Desktop or Start menu icon, then click Properties. The “Target” value is the full pathname. Select and copy, then paste into your item’s “URL” field.
Tip: a Courier export file can serve as a perfect item import file. For example you can export your items, externally edit the exported file, then re-import it.
Tutorial: building an item import file from scratch using external credential info:
Follow the steps below:
- run Excel/Libre Calc and click to open a new file
- change the file type drop-down to “Text files…”
- surf to your Courier user folder’s import folder (…Courier\{user}\imp)
- open the stub file “courierImportTemplate.txt”
- you’ll see a single row containing all possible valid column names
- note: the first three columns are required – all other columns are optional
- open your external credential file
- copy and paste in credential info from it
- sort the items by groups in the display order you want to see
- click to Save As to start saving the new import file
- change “Save As type” to show “Text (tab-delimited)”
- in “File name” type a new name for the import file
- make sure you’re still pointed to your “imp” folder
- click the “Save” button to write the new import file to disk
- this new file is now ready to import with Courier’s import item feature described above
- note: Courier’s import feature has strict validation, so you may need to tweak your import file
- after import, before clicking the settings editor “Save” button, inspect your items
- when you’re happy with the results, click the settings editor “Save” button
Click here for the knowledgebase index.


