
The Launchpad

Launchpad is Courier’s main window where you view groups and launch items. Arrange your items into groups any way you like. There is no limit on the number of items you can create.
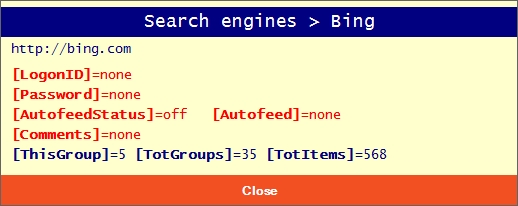
The left window shows your collection of groups, and the right window shows the items contained in the selected group. For example, the above image shows the “Bing” item selected in the “Search engines” group.
To create an item you must supply at least three values: (1) a group name, (2) an item name, and (3) a destination.
Destinations can be either distant or local.
A distant destination can be a website page or other Internet location like an FTP or File address.
A local destination can be any app installed on your computer, or any computer or network file like PDF, Word, or Excel.
Displaying Items in a Group
Click or select a group to display its collection of items in the right column.
Launching Your Items
When you launch an item Courier always jumps you to its destination. There are three ways to launch an item:
- right-click the item (recommended)
- click the item then click the green launch button
- use arrow keys to highlight an item then tap the <Enter> key
The Launch Popup Menu
When you right-click an item, Courier pops up a contextual menu, showing between three and seven options, based on information the item contains:
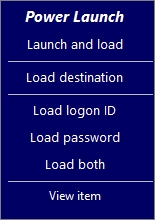
- Power Launch — launch destination then run item’s autofeed (typically feeds credentials)
- Launch [and load] — launch destination only (and load clipboard if option selected)
- Load destination — load clipboard with destination address
- Load logon ID — load clipboard with logon ID
- Load password — load clipboard with password
- Load both — load clipboard with both logon ID and password
- View item — display a summary of item contents
These handy popup options let you handle your items in any situation. The Load options mean you never again have to re-type your credentials into a destination — just load and paste what you need at the moment!
The Autofeed Edge
An autofeed is a powerful item option that feeds any combination of keystokes or pauses you want, such as logon ID and password, the <Tab> or <Enter> keys, or any string. Autofeeds are most often used to build powerful and time-saving one-click logons.
Tip: each item has its own unique autofeed.
Tip: autofeeds only feed credentials, pauses, strings, or keystrokes, and cannot mimic mouse actions.
Tip: For maximum browser compatibility Courier does not employ “AutoFill” technology.
Credential feed order options
You can choose between two feed modes for your logon ID or password:
- Left-to-right order — feeds credentials in a left-to-right order
- Randomized order — feeds credentials in a dynamic randomized order
We recommend selecting the randomized order to help confuse malware you may unknowingly have! See the “Autofeed editor” help page for details.
The Power Launch in Action
Seeing “Power Launch” on your launch menu means you have created an item autofeed and set it to active. Courier first launches your destination, then immediately begins running the autofeed steps.
Tip: Most autofeeds take time to execute, so don’t click your mouse or touch your keyboard until it completes. If you do, you might change the input focus which misdirects the autofeed keystrokes which can cause strange things to happen!
Notice by default, a running autofeed loops a sound while it runs, and also updates the green “Launch” button face. The first number it shows is the current step, and the second number is the total number of steps in the autofeed. When it finishes, the launch button will return to its normal face.
Canceling a Power Launch
Click any item or blank area in the item list to immediately cancel a running autofeed.
View item info
This handy function lets you peek at an item’s information without accessing the Item Editor. It shows the group and item names in the title bar, the destination path, item credentials, the autofeed on/off status, autofeed presence, and comments status. When you’re finished viewing, click the “Close” button. Note you can select and copy text from this window. To view all item info use the Item Editor.
Choose one of the following methods to view item info:
- mouse: right-click an item, then click “View item”
- keyboard: select an item with arrow keys, hold <Ctrl>, then tap the letter "I" key
Note red ink indicates an unassigned or empty value.
Note bottom row shows number of items in current group, number of groups, and total number of items in all groups.
Searching for Items
Over time you’ll likely create a large number of items, so you might lose track of which group an item is in.
Courier has three search tools to choose from:
- Quick-search the local group
- select an item
- repeatedly tap a key to jump to next item beginning with that key
- Quick-search all groups
- select an item
- hold the <Ctrl> key while you repeatedly tap a key to jump to next item beginning with that key — rotates through all groups
- Global item search
- select any item
- right-click the groups list or launch button, or hold the <Ctrl> key then tap the ? key
- type your search string in the popup window then tap <Enter>, or click Search button to show all
- view the search results in the popup data grid. You can then select a grid item, then click the yellow “Jump To” button to be jumped to the item
Moving or Resizing the Launchpad
Click and drag the top bar or outer border to move the Launchpad window. Click and drag the lower-right corner to resize the launchpad window. Courier supports multiple monitor screens. If you know Courier is running but can’t see the Launchpad, hold <Ctrl> while you tap the “L” key to move the Launcpad to the primary monitor.
Courier remembers its screen, location and size when it closes. When you run Courier again, it will place the Launchpad at its last known screen, location, and size.
Toolbar Buttons

- Blue ? Button
- Click to display Launchpad help information
- Right-click to display the password change reminder report
- Yellow Gear Button
- Click to open the Settings Editor where you can add, edit, delete, or move groups and items, and much more
- Green Launch Button
- Click to launch the currently-selected item
- Right-click to do a global item search
- Note: shows gray when no item is selected
- Red Close Button
- Click to close Courier
- Button will flash yellow to confirm the close
- Click again to close Courier, or click anywhere else to cancel the close
Password Change Reminder Report
All new items default with the reminder feature off. To activate it, call up the item in the Item Editor, then click the “Reminder” button, then pick a future reminder date, then click “Apply” then “Save.”
This report selects all items with a reminder date set, and orders them from oldest to newest. Overdue passwords show in red ink, with all others showing in green ink.
To view this report, do any of the following:
- right-click the Launchpad’s blue ? help button
- tap <Tab> until Help button is selected, then tap "R" key
- while an item is selected, hold the <Ctrl> key then tap the "R" key
Click here for the knowledgebase index.


